Привет друзья!
Однажды, в студеную зимнюю пору... участвуя в СП Маши "Утилизируем лоскутки на одеяло", нашила я впрок блоков из ярких цветных квадратиков. Часть из них ушла на одеяла (тык и тык). А часть - залежалась в недоделках.
Сегодня покажу и расскажу, куда я их пристроила.
Итак, мастер-класс "Подушка с сердцем и кантом".
Hi, guys!
Today I would like to show you how to sew an envelope heart pillowcase with piping.
2. Вырезать сердечко из тканевой заготовки по трафарету.
Use the template to cut a heart from the fabric block.
3. Из светлой плотной ткани вырезать заготовки для наволочки: 1 квадрат 43 x 43 см – передняя часть наволочки; 2 прямоугольника 43 x 30 см – задние части наволочки.
Cut pillowcase pieces from light dense-textured fabric: one square piece 43 x 43 cm (front piece of the pillowcase), two rectangular pieces 43 x 30cm (back pieces of the pillowcase).
4. Одну из сторон прямоугольника длиной 43 см подогнуть на ширину 1 см (два раза) и заутюжить. То же самое сделать с другим прямоугольником.
Fold one 43 cm side of the rectangular piece to the width of 1 cm (twice) and press. Do likewise for the other rectangular piece.
9. Приколоть сердечко к основной ткани.
Pin the heart to the main fabric.
10. Сметать детали, чтобы не произошло смещения во время сшивания на машинке.
Tap the parts together, so that they do not get displaced when sewn together with the machine.
11. На расстоянии 1-2 мм от края проложить отделочную «небрежную» строчку.
Make a separate ‘rough’ stitch 1-2 mm from the edge.
You can make the same pillowcase for the kidsroom or as a gift to your friends.
Однажды, в студеную зимнюю пору... участвуя в СП Маши "Утилизируем лоскутки на одеяло", нашила я впрок блоков из ярких цветных квадратиков. Часть из них ушла на одеяла (тык и тык). А часть - залежалась в недоделках.
Сегодня покажу и расскажу, куда я их пристроила.
Итак, мастер-класс "Подушка с сердцем и кантом".
Hi, guys!
Today I would like to show you how to sew an envelope heart pillowcase with piping.
1. Сшить
блок из квадратов (4 на 4). Сделать трафарет-сердце.
Sew together a block made of squares (4 x 4). Make a heart template.
Sew together a block made of squares (4 x 4). Make a heart template.
2. Вырезать сердечко из тканевой заготовки по трафарету.
Use the template to cut a heart from the fabric block.
3. Из светлой плотной ткани вырезать заготовки для наволочки: 1 квадрат 43 x 43 см – передняя часть наволочки; 2 прямоугольника 43 x 30 см – задние части наволочки.
Cut pillowcase pieces from light dense-textured fabric: one square piece 43 x 43 cm (front piece of the pillowcase), two rectangular pieces 43 x 30cm (back pieces of the pillowcase).
4. Одну из сторон прямоугольника длиной 43 см подогнуть на ширину 1 см (два раза) и заутюжить. То же самое сделать с другим прямоугольником.
Fold one 43 cm side of the rectangular piece to the width of 1 cm (twice) and press. Do likewise for the other rectangular piece.
5. Обвести
трафарет-сердце ровно посередине передней части наволочки.
Using the template, draw a heart exactly in the middle of the front piece of the pillowcase.
Using the template, draw a heart exactly in the middle of the front piece of the pillowcase.
6. Отступив
0,5 см от линии нарисовать еще одну внутреннюю линию.
Draw one more internal line 0.5 cm from the original outline.
Draw one more internal line 0.5 cm from the original outline.
7. Вырезать
сердце по внутренней линии.
Cut the heart along the internal line.
Cut the heart along the internal line.
8. Выбрать
нитки для отделочного шва в тон тканям сердечка.
Select threads for the decorative stitch to match the colour of the heart.
Select threads for the decorative stitch to match the colour of the heart.
9. Приколоть сердечко к основной ткани.
Pin the heart to the main fabric.
10. Сметать детали, чтобы не произошло смещения во время сшивания на машинке.
Tap the parts together, so that they do not get displaced when sewn together with the machine.
11. На расстоянии 1-2 мм от края проложить отделочную «небрежную» строчку.
Make a separate ‘rough’ stitch 1-2 mm from the edge.
12. Рядом
с первой строчкой проложить нитью другого цвета вторую строчку.
Make a separate stitch of different colour next to the first stitch.
Make a separate stitch of different colour next to the first stitch.
13. Такие
же «небрежные» строчки проложить по заутюженным краям задних частей наволочки.
You can make the same ‘rough’ stitches along the pressed hems of back pieces of the pillowcase.
You can make the same ‘rough’ stitches along the pressed hems of back pieces of the pillowcase.
14. Для
декоративного канта необходимо сделать косую бейку. Для нее понадобится
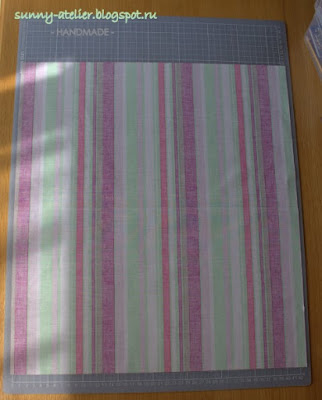
яркая ткань в тон сердечку размером примерно 40 на 40 см.
Make a bias for the decorative piping. You will need bright fabric to match the colour of the heart, sized approximately 40 x 40 cm.
Make a bias for the decorative piping. You will need bright fabric to match the colour of the heart, sized approximately 40 x 40 cm.
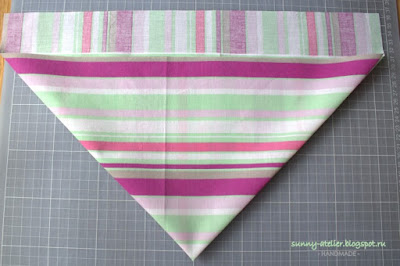
15. Сложить
ткань по диагонали.
Fold the fabric diagonally.
Fold the fabric diagonally.
16. И еще
раз по диагонали.
And once again fold diagonally.
And once again fold diagonally.
17. Результат.
The result.
The result.
18. Снова
согнуть ткань, как на рисунке.
Fold the fabric once again, as shown on the picture.
Fold the fabric once again, as shown on the picture.
19. Результат.
The result.
The result.
20. Выровнять
край сгибов ткани по линейке.
Straighten the fold edges using a ruler.
Straighten the fold edges using a ruler.
21. Срезать
край.
Cut the edge.
Cut the edge.
22. Отмерить
5 см (2 дюйма на линейке на фото) от срезанного края.
Measure 5 cm (2 inches on the ruler on the photo) from the cut edge.
Measure 5 cm (2 inches on the ruler on the photo) from the cut edge.
23. Отрезать.
Cut.
Cut.
24. Отрезать
полоски по 5 см еще два раза.
Cut two more 5 cm strips.
Cut two more 5 cm strips.
25. Сложить
вместе полученные полоски ткани (они разной длины) и выровнять концы.
Put the fabric strips together (they are of different length) and straighten the edges.
Put the fabric strips together (they are of different length) and straighten the edges.
26. Сложить
перпендикулярно две полоски ткани лицевыми сторонами внутрь. Провести
карандашом диагональ и сколоть булавкой. То же самое сделать с другими
полосками ткани.
Put two fabric strips perpendicular to each other, face side inside. Draw a diagonal line with a pencil and pin together. Do the same with the other strips.
Put two fabric strips perpendicular to each other, face side inside. Draw a diagonal line with a pencil and pin together. Do the same with the other strips.
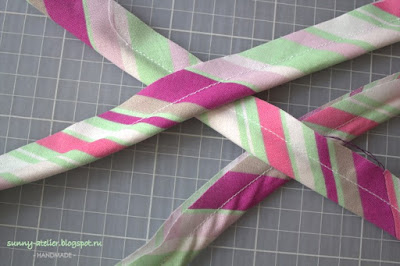
27. По
диагонали проложить строчку. Лишнюю ткань срезать на расстоянии 0,5 см от
строчки.
Make a diagonal stich. Cut extra fabric 0.5 cm from the seam.
Make a diagonal stich. Cut extra fabric 0.5 cm from the seam.
28. Шов
разутюжить. Получилась косая бейка.
Press open. Now we have a bias.
Press open. Now we have a bias.
29. Косую
бейку сложить пополам и вставить внутрь шнур, отступив от начала бейки 1 см.
Fold the bias in half and put a cord inside. Allow 1 cm from the end of the bias.
Fold the bias in half and put a cord inside. Allow 1 cm from the end of the bias.
30. Зафиксировать
шнур внутри бейки булавками.
Secure the cord inside the bias with pins.
Secure the cord inside the bias with pins.
31. Максимально
близко к шнуру проложить строчку.
Stitch as close to the cord as possible.
Stitch as close to the cord as possible.
32. Результат.
Длина канта должна быть на 1,5 см больше периметра вашей наволочки.
The result. Piping length should be 1.5 cm more than the perimeter of your pillowcase.
The result. Piping length should be 1.5 cm more than the perimeter of your pillowcase.
33. Взять
переднюю часть наволочки, отступить на 1,5 см от края и провести по всему
периметру линию (с лицевой стороны).
Take the front piece of the pillowcase, allow 1.5 cm from the edge and make a line along the whole perimeter (on the face side).
Take the front piece of the pillowcase, allow 1.5 cm from the edge and make a line along the whole perimeter (on the face side).
34. По
линии закрепить булавками кант.
Pin the piping along the line.
Pin the piping along the line.
35. В
уголках наволочки слегка надсечь ткань канта и сделать закругленный угол.
Make notches in the corners of the pillow case and make a rounded corner.
Make notches in the corners of the pillow case and make a rounded corner.
36. Конец
канта вставить в начало, совместив концы шнура.
Insert one end part of the piping into the other and align the band ends.
Insert one end part of the piping into the other and align the band ends.
37. Закрепить
булавкой.
Pin together.
Pin together.
38. Результат.
The result.
The result.
39. Сделать
строчку в строчку.
Stich together, so the stiches align.
Stich together, so the stiches align.
40. Результат.
The result.
The result.
41. На
лицевую часть передней детали наволочки наложить лицевую часть одной из задних
частей. Зафиксировать по краю булавками.
Place one back piece face down on the face of the front piece. Pin together along the edge.
Place one back piece face down on the face of the front piece. Pin together along the edge.
42. То же
самое сделать со второй задней частью.
Do the same with the second back piece.
Do the same with the second back piece.
43. Сшить
все детали вместе, проложив строчку вдоль существующей уже строчки.
Sew all the parts together by making a stitch along the existing stitch.
Sew all the parts together by making a stitch along the existing stitch.
44. Выровнять
края, закруглить уголки и, при желании, обработать край зигзагом.
Straighten the edges, round the corners and, if you wish, finish the edges with a serger.
Straighten the edges, round the corners and, if you wish, finish the edges with a serger.
45. Вывернуть
наволочку.
Turn outside in.
Turn outside in.
46. Вставить
в наволочку подушку.
Insert the pillow into the pillow case.
Insert the pillow into the pillow case.
47. Вид
сзади.
Rear view.
Rear view.
48. Уголок.
The corner.
The corner.
Вот такая девичья подушка получилась :) Можно поселить в детской дочки или сшить парочку таких на подарки.
You can make the same pillowcase for the kidsroom or as a gift to your friends.
Размер наволочки 40 на 40 см.
The size of the pillowcase is 40 x 40 cm.
The size of the pillowcase is 40 x 40 cm.
До встречи!
P.S. Спасибо за теплые комментарии к моему предыдущему посту!
Thanks for your nice comments on my previous post!
Bye-bye!
Thanks for your nice comments on my previous post!
Bye-bye!


Очень здорово! Такая позитивная подушка вышла!!!
ReplyDeleteВроде все просто, но какой результат чудесный! И для меня ценная информация о способе раскроя косой бейки, спасибо! :)
ReplyDeleteшикардос
ReplyDeleteЧудесная подушечка! Элона, все твои изделия прямо-таки излучают солнышко! Яркие и позитивные!
ReplyDeleteВАУ ! Спасибо за МК ! Подушка получилась очень сердечная ...класс !!!
ReplyDeleteСлууушай как классно! я как не пропустила этот мк! спасибо, такой понятный и подробный) подушечка супер!
ReplyDeleteМК-супер!!! Подушка загляденье!!!
ReplyDeleteМК-супер!!! Подушка загляденье!!!
ReplyDelete